Androidでテスト入門してみた①
早速ですが、僕はスプラトゥーンが大好きです。
新武器が出るとギアをこの組み合わせにすればこういう戦法が取れるのではないかと考えはじめます。
夜に考えはじめると眠れなくなります。
プレイし始めると1時間のつもりが2時間、3時間とやってしまい際限なくやって休日が潰れます。そして日曜日の夕方に
「ああ、今週何もできなかった・・・」と悔やむことがあります。
そんな日々に終止符を打ちたいと思い、スプラトゥーンを自分へのご褒美としてTODOをやるとできるような仕組みを作ろうと思い
「スプラカウンターというアプリを考えました。」
中身はただのカウントアップ・ダウンをしてその結果を表示するアプリです。
TODOをやったらカウントアップ、試合をやったらカウントダウンします。人力です。完全にテストの勉強で作ってます。
早速作っていきます。
<開発環境>
・Android Studio 1.5.1
まずは空のプロジェクトを作成して実行します。

次にテストを作っていきます。テスト内容は
1. カウントを表示するビュー(以下カウンター)がデフォルトで0になっている
2. カウントアップを押すとカウンターが1増える
3. カウントダウンを押すとカウンターが1減る
です。
今回はテストにEspressoを使用するので./app/gradleで定義します。
androidTestCompile 'com.android.support.test.espresso:espresso-core:2.2.1'
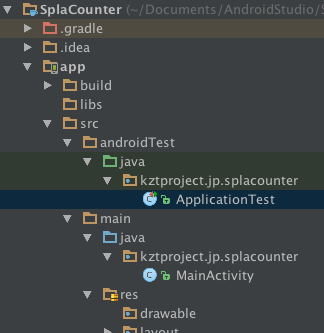
次にandroidTest内のApplicationTestクラスと同じ階層にMainActivityTestクラスを作成します。

MainActivityTest.java
@RunWith(AndroidJUnit4.class)
@LargeTest
public class MainActivityTest {

    @Rule
    public ActivityTestRule<MainActivity> mActivityRule =
            new ActivityTestRule<MainActivity>(MainActivity.class);

    }
}
中身はこんな感じ。ActivityTestRuleは理解できてません。
特定のAcitivtyを起動しておいてくれる便利処理という認識です。
ここにテストを書いていきます。
1. カウントを表示するビュー(以下カウンター)がデフォルトで0になっている
ここでテストコード書いているときに気づいた。EspressoでViewの参照を取ってくるときにID指定するけど、レイアウトxmlに書いてないとエラーになりますね。仕方ないのでxmlを作ります。これすでにTDDじゃないのでは・・・
みんなどうやってテスト書いてるのか知りたい。
activity_main.xml
<RelativeLayout xmlns:android="http://schemas.android.com/apk/res/android"
    xmlns:tools="http://schemas.android.com/tools"
    android:layout_width="match_parent"
    android:layout_height="match_parent"
    android:paddingBottom="@dimen/activity_vertical_margin"
    android:paddingLeft="@dimen/activity_horizontal_margin"
    android:paddingRight="@dimen/activity_horizontal_margin"
    android:paddingTop="@dimen/activity_vertical_margin"
    tools:context="kztproject.jp.splacounter.MainActivity">

    <TextView
        android:id="@+id/text_counter"
        android:layout_width="match_parent"
        android:layout_height="wrap_content" />

    <Button
        android:id="@+id/count_up_button"
        android:layout_width="wrap_content"
        android:layout_height="wrap_content"
        android:layout_alignParentBottom="true" />

    <Button
        android:id="@+id/count_down_button"
        android:layout_width="wrap_content"
        android:layout_height="wrap_content"
        android:layout_alignParentBottom="true"
        android:layout_alignParentRight="true" />

</RelativeLayout>
テストがメインなのでレイアウトは雑に作ります。
テストは下記のようになります。
MainActivityTest.java
@Test
    public void testCounterShow() {
        onView(withId(R.id.text_counter)).check(matches(withText("0")));
    }
Android StudioのProjectにあるMainActivityTest.javaを右クリックし Run 'MainActivityTest'を選択してテストを実行します。

あれ、テストがない?ちゃんと書いたはずなんですが・・・
調べてみるとテストランナーの指定がなかったのでAndroidJUnitRunnerの記述を./app/build.gradleに追記しました。
build.gradle
apply plugin: 'com.android.application'

android {
    compileSdkVersion 23
    buildToolsVersion "23.0.2"

    defaultConfig {
        applicationId "kztproject.jp.splacounter"
        minSdkVersion 14
        targetSdkVersion 23
        versionCode 1
        versionName "1.0"
        testInstrumentationRunner "android.support.test.runner.AndroidJUnitRunner"
    }
    buildTypes {
        release {
            minifyEnabled false
            proguardFiles getDefaultProguardFile('proguard-android.txt'), 'proguard-rules.pro'
        }
    }
}

dependencies {
    compile fileTree(dir: 'libs', include: ['*.jar'])
    compile 'com.android.support:appcompat-v7:23.0.1'

    androidTestCompile 'com.android.support.test.espresso:espresso-core:2.2.1'
    androidTestCompile 'com.android.support.test:runner:0.4.1'
}
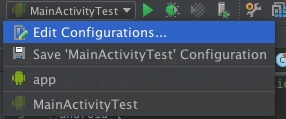
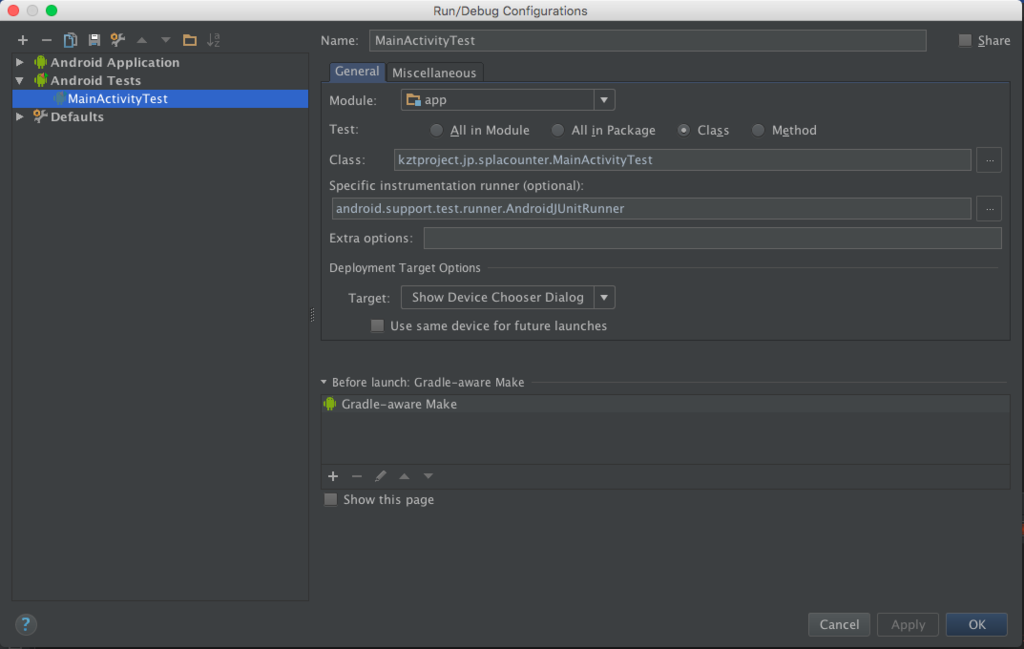
その後に、実行ボタン隣のドロップダウンリスト?をクリックしてEdit Configurationを選択

Specific instrumentaion runnerにAndroidJUnitRunnerの記述を加えます。

再度実行してみます。

いい感じに失敗したので、TextViewにデフォルト0を入れてあげます。
android:text="0"

通りました。
これで1は完了です!
2. カウントアップを押すとカウンターが1増える
テストの土台ができたのでサクサク行きます。
@Test
    public void clickCountUp() {
        onView(withId(R.id.count_up_button)).perform(click());
        onView(withId(R.id.text_counter)).check(matches(withText("1")));
    }
実行すると失敗します。
カウントアップ処理を作ります。
Viewの操作が入るのでButter Knifeを使います。
@OnClick(R.id.count_up_button)
public void clickCountUp(View view) {
    int count = Integer.parseInt(mTextCounter.getText().toString());
    mTextCounter.setText(String.valueOf(count + 1));
}
こんな感じの処理になりました。
再度テストを実行すると全テストがパスしました。
3. カウントダウンを押すとカウンターが1減る
最後です。試合ができる回数がマイナスになるのはおかしいので
カウントダウンのテストと0のときに押しても0のままになることを確認するテストを書きます。
@Test
    public void clickCountDown() {
        onView(withId(R.id.count_up_button)).perform(click());
        onView(withId(R.id.text_counter)).check(matches(withText("1")));

        onView(withId(R.id.count_down_button)).perform(click());
        onView(withId(R.id.text_counter)).check(matches(withText("0")));

        onView(withId(R.id.count_down_button)).perform(click());
        onView(withId(R.id.text_counter)).check(matches(withText("0")));
    }
メソッド分けなくてもいい気がしますが、分けたほうがわかりやすいかも?
@OnClick(R.id.count_down_button)
    public void clickCountDown(View view) {
        int count = Integer.parseInt(mTextCounter.getText().toString());
        mTextCounter.setText(String.valueOf(count - 1));
    }
カウントダウン処理を入れました。これで実行します。
エラーになります。今のソースではマイナスの値も入力できてしまいます。
なので
@OnClick(R.id.count_down_button)
    public void clickCountDown(View view) {
        int count = Integer.parseInt(mTextCounter.getText().toString());
        if (count == 0) {
            return;
        }
        mTextCounter.setText(String.valueOf(count - 1));
    }
マイナス値回避処理を追記します。
これで実行すると全てのテストが通ります。
簡単ではありますがこれで終わりです。
終わってから気づいたんですが、カウントの保存機能がないという致命傷が・・・
まだ実用段階ではないですね。
もう疲れたので次回以降実装したいと思います。
頑張ってブログ書いたのでスプラトゥーンしてきます。ではでは<追記>
需要があるかわかりませんがGitHubにあげておきます。
スプラカウンター